 Here is my first run through of an Extra Special Bitter which served as a test batch more than anything for Simpsons Golden Naked Oats which I wanted to try. Overall, pretty good! I like it. The Naked Oats provide a little bit of a berry nut flavor which is definitely unique and I will be trying again. I based my recipe off some of these links as well as Ray Danielle's Book Designing Great Beers although I obviously tossed in the specialty oats at my own discretion. http://www.bjcp.org/2008styles/style08.php#1chttp://beersmith.com/blog/2009/06/01/english-pale-ale-recipes/90% Floor Malted Maris Otter 5% Medium English Crystal 5% Simpsons Golden Naked Oats 60 minutes EKG hop addition to 20 IBUs 15 minutes EKG hop addition to 20 IBUs 0 minute EKG hop addition Fermented with a ton of British Ale II Changes I would make for round two would be firming up the body a bit which is a tad lacking. Either mashing a bit higher than 150*, adding a bit more crystal malt or maybe switching to a lower attenuating English yeast like the Wyeast ESB strain. Other than that, maybe increasing a tad the IBUs from that first addition but it's pretty tasty as is.
Here's the tasting video.
While fantasizing about the coming summer weather one thing that I couldn't help but think about was gardening and while thinking about gardening one thing I couldn't help but think about was growing hops. Last summer I planted a Nugget hop rhizome in the backyard mostly because a Midwest Supplies catalog said they grew well in all climates and had a higher Alpha Acid content. I knew nothing about them but decided to go for it because it sounded cool and easy to grow. With a lot of time away from the house leading to poor care and a generally dry summer I finally got some cones growing at the end of the year but the two dozen or so that sprouted never came close to maturity leaving me without any homegrown hops. And without any homegrown Nugget hops I still have not used the hops that I am growing in the backyard. So, long story short I was pondering this over the other day I decided a little research was necessary. homebrewstuff.com had this to say: 11-16% All Purpose Strong heavy and herbal, spicy aroma and high bittering value (along with desirable growing traits) has brought this hop variety to the forefront of the industry. Selected from a cross between Brewer's Gold and a high alpha male. Used For: Extremely bitter. All Ales, Stouts Subs: Chinook, Galena, Cluster The beerbecue, which I'm assuming is another homebrew blog out there, went a tad deeper: These are a common bittering hop, but some use them later in the boil, or for dry hopping, for the flavor and aroma they impart. The flavor and aroma are generally pungent, herbal, and spicy, much like the Columbus hop. Although, Columbus hops have a higher alpha acid content (bringing more bitterness to the beer), and Nugget hops lose less flavor and aroma from their essential oils over time due to their better storage stability. Their similarity is no surprise, however, as apparently Nugget and Columbus hops share the same mother: Brewers Gold. And highgravitybrew.com had this telling bit of information: A high alpha acids hop with a good aroma profile So basically what I’m getting here is spicy, herbal, pungent and strong. Not really a whole lot of variety from description to description but at least this confirms my belief that they are a good hop to grow with desirably easy traits. So now the question is what should I do with them. Well, I guess the answer is to toss them in an IPA. I think SMaSH brews are a bit boring although they would serve the best vehicle for experimenting with new hops but instead I’m going to shoot for a plain old IPA with some domestic 2-Row, a bit of Munich and a splash of Crystal-20. Hopefully this will be a recipe that will give a bit of backbone to the beer but will not overpower the hop flavor which will be derived from a 60 minute bittering charge and then hopbursting and dry hopping at the end. Results to come. Anyone have any experience with Nugget hops? Like them? Love them? Hate them?
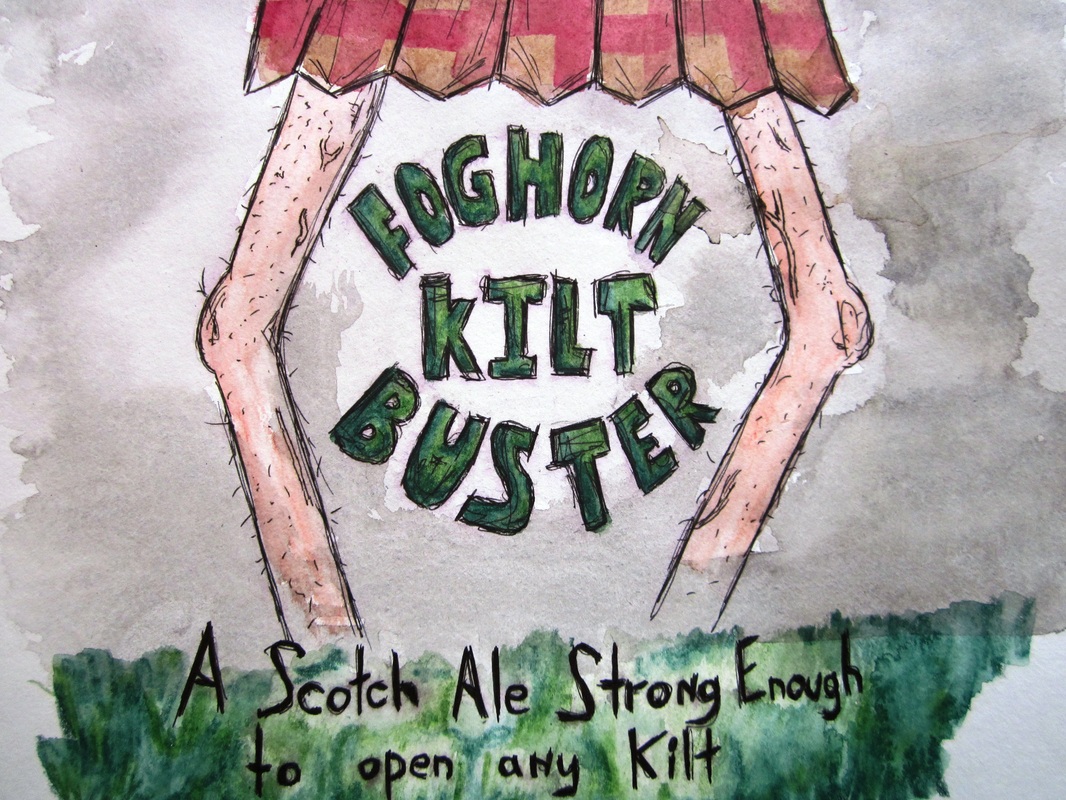
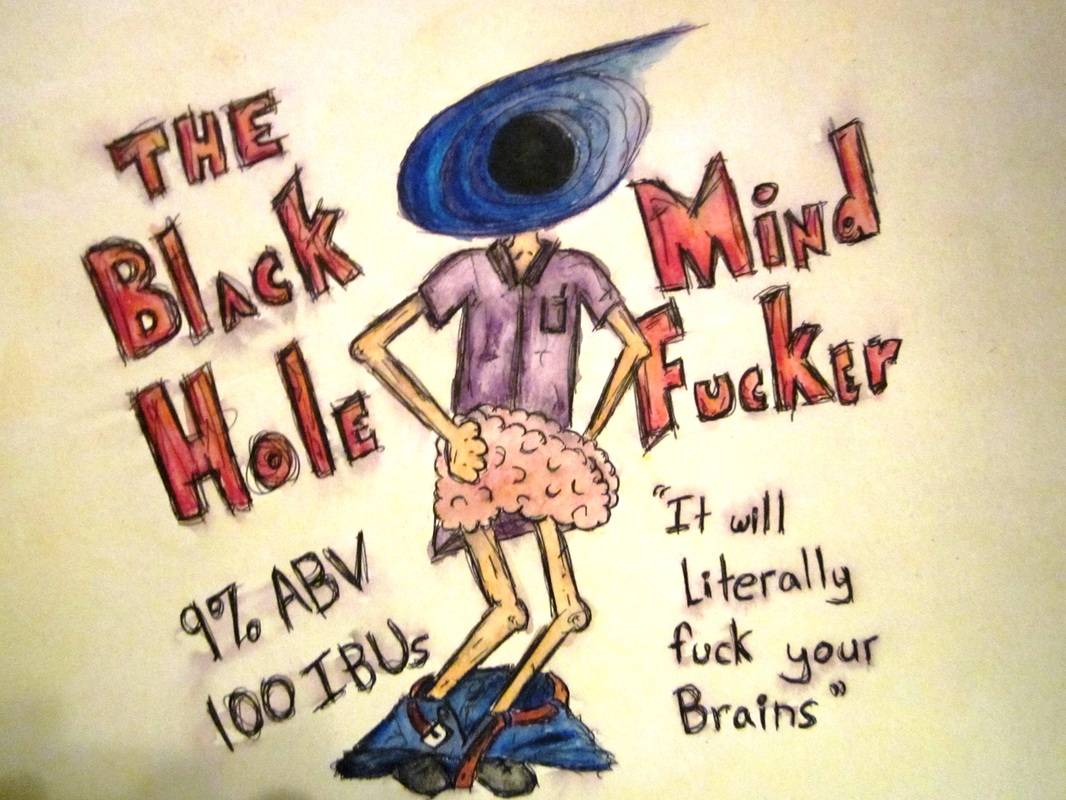
Just for fun here are a couple of my new quasi paintings that will be turned into labels in the future. I say quasi-paintings because they look to be done with watercolor paints but they are actually watercolor pencils. These are essentially dried watercolors that have been compressed into the form of a colored pencil. You can sketch a drawing with them and then apply water with a paintbrush to get the watercolor painting effect. I'm learning but still suck at watercolor painting so this is kind of a cheat that right now yields better results.. The wash in in the backgrounds is all traditional watercolor paint but the detailed parts are done with the pencil.
Anyways, enough artsy-shmartsy stuff. Here are the future labels for the Black Hole Mind Fucker Russian Imperial Stout and the Foghorn Kilt Buster Strong Scotch Ale. A tasting will have to wait because they won't be opened until Christmas next year. Yes, they are somewhat disgusting and volgure but these are going out to a group of guys so i
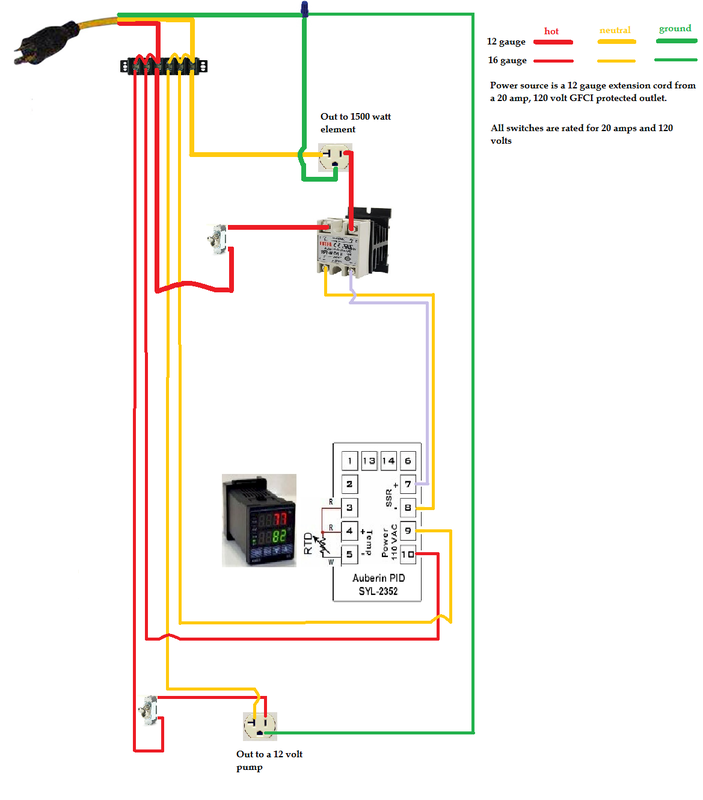
As of right now this is the diagram I am working with for my electrical system. Pretty simple as far as these things go but two months ago I wouldn't be able to understand any of this. And yes, I ghetto rigged this drawing with Microsoft paint. I know, classy right? Anyways, this is pretty basic. Power comes from a 20 amp 110 volt GCFI outlet in the kitchen through an extension cord with 12 gauge wire. GCFI means that the outlet is protected and will switch off if something goes wrong and I needed the 12 gauge wire to care the amount of amps required for this. The cord goes into the box where I jump it through the terminal block to wire up everything I need. There will be two switches and two outlets controlling the power to the pump and the heating element. The switch to the element is needed so that it won't turn on whenever I plug in the control box which protects against dry firing which would ruin the element. The switch and outlet for the pump is really just a convenience and I debated including it or just plugging it into the wall but decided it would be handy. The PID, which is basically the controller of the whole operation, will always be on. It will relay through the SSR when to turn on the heating element and when to turn it off to maintain mash temperatures and a boil. The SSR is needed because the PID doesn't actually supply enough power for a heating element so the main power needs to be run through there.
There may be a few add ons at some point in the future and this diagram leaves room for that. You can attach an alarm to the PID to tell you when you meet strike temps meaning you can turn it on and walk away to go about your day until you're ready to dough in. I will probably include some fuses also to protect my electrical equipment. There may also be a master on/off switch in the future just for an added level of control. The Brew Kettle: Complete with ball valve, RTD temperature probe and water heater element Brew Kettle 7.5 Gallon Stainless Steel Kettle: 13 ½” high, 123/4” wide: $70 http://www.midwestsupplies.com/stainless-steel-kettle-with-handles-and-lid-7-5-gallon.html Ball valve and diptube½” SS Ball Valve: $21 http://www.midwestsupplies.com/stainless-steel-ball-valve.html90* ½” SS Elbow for dip tube: $10 http://www.midwestsupplies.com/1-2-stainless-steel-female-npt-90-degree-elbow.htmlWeldless Thermabob Adapter: $9 http://www.midwestsupplies.com/weld-b-gone-thermabob-adapter.html RTD and attachmentLiquid Tight RTD Sensor: $35 http://www.auberins.com/index.php?main_page=product_info&cPath=20_15&products_id=246Weldless Thermabob Adapter: $9 http://www.midwestsupplies.com/weld-b-gone-thermabob-adapter.htmlElement and AttachmentsCamco 1500W Screw in element: $9 http://www.amazon.com/Camco-02143-1500-Screw-Element/dp/B0006IX89Q/ref=sr_1_4?ie=UTF8&qid=1355153326&sr=8-4&keywords=120v+water+heating+element1” SS Locknut: $6.5 http://www.amazon.com/gp/product/B003GXF5EO/ref=oh_details_o00_s00_i00 Plug: $4 http://www.homedepot.com/buy/leviton-15-amp-125-volt-rubber-grounding-plug-r60-515pr-000.html#.UO4SaG8SffI1 ¼” x 1 ¼” rubber coupling: $5.5 http://www.homedepot.com/h_d1/N-5yc1v/R-100055392/h_d2/ProductDisplay?catalogId=10053&langId=-1&keyword=coupling&storeId=10051#.UO4S7G8SffI Pump and recirculation returnSS Pump: $75 http://www.ussolarpumps.com/onlinestore/index.php?main_page=product_info&cPath=1_22&products_id=32½” SS Locknut: $4 http://www.midwestsupplies.com/1-2-female-stainless-lock-nut.html½” SS MPT x ½” Barb: $7 http://www.midwestsupplies.com/1-2-mpt-x-1-2-barb-stainless.html½” Silicone Tubing: $2.99 per foot http://www.midwestsupplies.com/1-2-silicone-silcon-hose-per-foot.html ½” SS Tubing Clamp: $2 http://www.midwestsupplies.com/1-2-stainless-steel-tubing-clamp.html (3) Blichmann Quick Disconnects: $14 http://www.midwestsupplies.com/blichmann-quickconnectors-1-2-npt-x-1-2-id-hose.htmlShirron Plate Chiller http://www.midwestsupplies.com/shirron-economy-counterflow-chiller.html Control Box: Controls mash temp, power to the heating element and the pump Project Box (really just a plastic storage box): $4http://www.target.com/p/sterilite-clip-box-set-of-4-green-medium/-/A-13487783?reco=Rec|pdp|13487783|ClickCP|item_page.vertical_1&lnk=Rec|pdp|ClickCP|item_page.vertical_1PID, SSR, Heatsink PID: SYL 2352: $45 http://www.auberins.com/index.php?main_page=product_info&cPath=1&products_id=340A SSR and Heatsink: $12 http://www.amazon.com/DC-AC-Solid-State-Relay-Heatsink/dp/B005K2IXHU/ref=sr_1_sc_1?ie=UTF8&qid=1355152467&sr=8-1-spell&keywords=25A+ssr+and+heatsingSwitches and outlets(3) Gardner Bender single pole 20 amp toggle switches: $12 http://www.homedepot.com/h_d1/N-5yc1v/R-100030219/h_d2/ProductDisplay?catalogId=10053&langId=-1&keyword=20+amp+toggle+switch&storeId=10051#specifications15 Amp Outlet: $3 http://www.homedepot.com/h_d1/N-5yc1v/R-202066674/h_d2/ProductDisplay?catalogId=10053&langId=-1&keyword=15amp+outlet&storeId=10051&superSkuId=202887036#.UN4UIG8SffI Extension Cord12-3, 25’ Extension cord: $21 http://www.menards.com/main/p-1908971-c-6410.htm Wiring GutsGardner Bender 22 - 10 AWG 30-Amp 600-Volt 6-Circuit Terminal Block: $6 http://www.homedepot.com/h_d1/N-5yc1v/R-202522482/h_d2/ProductDisplay?catalogId=10053&langId=-1&keyword=terminal+block&storeId=10051#.UN4JEG8SffI16 awg wire: $10 (bought a red and black) http://www.homedepot.com/h_d1/N-5yc1v/R-202206417/h_d2/ProductDisplay?catalogId=10053&langId=-1&keyword=16+gauge+wire&storeId=10051#.UN4RT28SffIAn assortment of spade terminals, eye terminals, butt splices, heat shrink, electrical tape and probably a few other things.
Before I get to whether or not an electrical newb can pull off an electric brew in a bag setup we need a little background and explanation. So a little about myself and what I want. I started extract brewing with specialty grains and evolved into an all grain brewer via the ten gallon Rubbermaid cooler system with an eight gallon boil kettle and a propane burner. I love the cheapness and simplicity of this system when paired with batch sparging but do have a couple of complaints about the equipment I use now and they are as follows: 1. Equipment is scattered throughout the garage, basement and main floor of the house due to space constraints making it a big to-do to setup everything, clean it and return it to its proper place. 2. I hate worrying about propane. Buying it, guessing whether or not you have enough, guarding against the wind, worrying about burning the house down, ect. 3. It sucks brewing outside in the winter in Minnesota. So with that in mind let’s talk about what I want. I want something simple, electric and something that doesn’t suck up a lot of space. Being that I don’t know much about electricity and that I don’t want to be confined to the basement I want to brew on a 20 amp 110 volt GFCI outlet rather than a 240 outlet which is located downstairs or would need to be installed upstairs. I also want to keep this relatively inexpensive. With all of this floating around I stumbled upon this thread at homebrewtalk.com: http://www.homebrewtalk.com/f170/110v-recirculating-ebiab-2-5-gallon-batches-341219/ It is pretty much everything I want. I have the ability/time to brew frequently so I like the idea of 2.5 gallon batches, love the BIAB setup and like the relative simplicity of the electrical design. It was however a bit more expensive than I wanted so I’m shooting for a cheaper version of this. While I do want cheaper I’m not looking to dumb it down which may compromise safety. This setup also eliminates some of the issues I’ve had with small batches BIABs. By this I mostly mean maintaining temperature and getting a good boil. Overall there are three things I really like about this; the idea of full volume mashing BIAB, an electrically powered heating element and the recirculating mash. Full Volume Mashing BIAB: I like this because it uses very little equipment meaning there is less to store and less to clean. It is also simple, easy and fast and can be done indoors during MN winters. And the main reason it is viable to me is because this setup still makes great all grain beer! Electric: I wanted to go electric because it gets rid of the need for annoying propane and it gets 100% efficiency with no wind or crappy stovetop burner to worry about. Once again an upside is that it can be done inside but with a long enough extension cord can also be done outside in the summer. I can also utilize a control panel to maintain mash temperature which brings me to my next point. Recirculating mash: I liked the idea of recirculating my mash because my pot is really thin and I’ve had trouble in the past of staying consistent with mash temperature. A pump eliminates the need for stirring and also maintains a consistent temp when the control panel turns on the heating element. Also, it looks better (and cooler I think) than trying to insulate your pot to maintain temperature. So there it is. Everything is already in the works. Can’t wait to properly get this up and running.
 Finally the In House Brew Pumpkin Beer is being drank! Looking back through the notes of Part One ( Research), Part Two ( Designing a Recipe) and Part Three ( Brewing) this journey started on August 21st and is now finally being consumed on November 29th but better late than never right? The end goal of this project was a drinkable Pumpkin Beer; something that wasn't going to slap you in the face with spices or sweetness the way several examples of the style do. An idea that originated over the quandary of what to do with garden pumpkins evolved into learning something new about autumn brewing. So what does it taste like you ask? Is it too overbearing? Too subdued to notice? Nicely balanced? Or maybe just muddled and confused? Well, the smell comes in right off the bat as a mixture of a biscuity goodness with a hint of cinnamon. There’s very poor head retention and the color is a bit darker than anticipated but over all a decent enough looking brown ale. There’s a hint of caramel sweetness and a bit of bready flavor mixed with a tad of roastiness and followed by a lingering pumpkin spice flavor that remains after going down. Normally when the term “lingering” is used in the description of a beer it is a bad thing but there is just enough there to remind you it is a pumpkin beer without blowing you out of your mind. Overall: success! If it needed to be done again, which I sure it will next fall, it may be aided from some body and head enhances. The initial thoughts were for flaked wheat or maybe even flaked oats but they were nixed for the sake of simplicity. Perhaps either of those would be good additions. With the spices it almost tastes a little too bitter so using slightly less spice, lowering the IBUs or perhaps mashing higher to achieve a little more sweetness to round that out would work. Overall though; not bad at all for a first run through. Type: All Grain Batch Size (fermenter): 2.50 gal Boil Size: 3.88 gal End of Boil Volume 3.13 gal Brewhouse Efficiency: 60.00 % Ingredients Amt Name Type # %/IBU 5 lbs Pale Malt, Maris Otter (3.0 SRM) Grain 1 76.9 % 1 lbs Caramel/Crystal Malt - 80L (80.0 SRM) Grain 2 15.4 % 4.0 oz Amber Malt (22.0 SRM) Grain 3 3.8 % 4.0 oz Chocolate Malt (350.0 SRM) Grain 4 3.8 % 0.50 oz Goldings, East Kent [5.00 %] - Boil 60.0 min Hop 5 16.5 IBUs 0.50 oz Goldings, East Kent [5.00 %] - Boil 10.0 min Hop 6 6.0 IBUs 1/2 teaspoon Cinnamon, 1/4 teaspoon Ginger, 1/8 teaspoon Nutmeg, 1/8 teaspoon Clove. 1.0 pkg British Ale Yeast (Wyeast Labs #1098) Est Original Gravity: 1.057 SG Measured Original Gravity: 1.055 SG Est Final Gravity: 1.013 SG Measured Final Gravity: 1.015 SG Bitterness: 22.5 IBUs Est Color: 25.4 SRM Mash Name: BIAB, Medium Body 152*
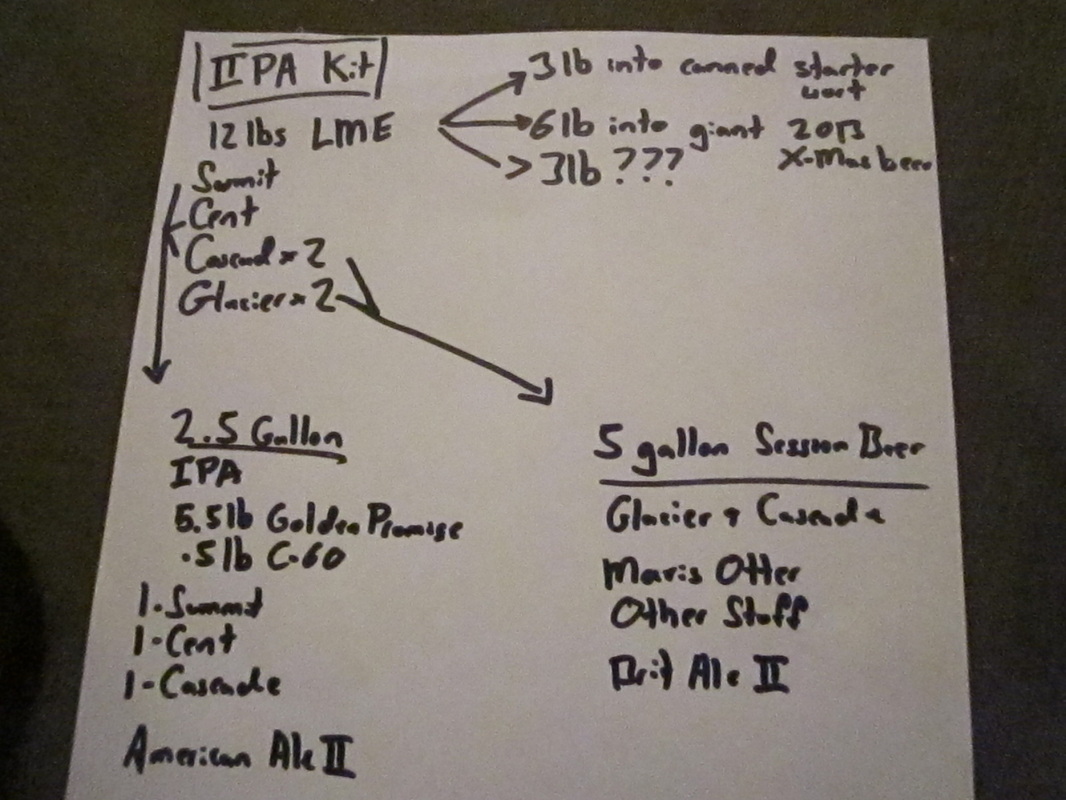
Alright! I admit it; I had a bit of a moral breakdown. Come on though, don’t we all every once and awhile? One fine evening a while back I noticed on a homebrew forum that someone posted about the Northern Brewer’s extract IIPA kit being listed for $21 at the checkout when it was priced at $55 on the product page. I had a few homebrews in me, thought about how this is probably a mistake
by some internet guy they hired because there was no sale going on, decided it may be morally wrong to take advantage of said mistake and did it anyways. Long story short, I now have a IIPA kit that I don’t really want because I don’t like brewing giant beers that clog up a keg line for months. So I needed something to do.
First things first, I decided definitely not to brew this beer. I made it a few years back as an extract brewer and wasn’t crazy about it. It was too malty and not hoppy enough for my tastes. So, with that decision made I needed to decide what to do with the ingredients.
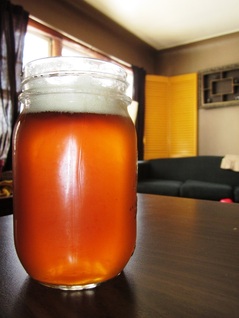
This is what I came up with: Step One: Canning starter wort for future use. I used half of a six pound container of LME in two gallons of water, boiled for fifteen minutes and then added to cleaned and sanitized mason jars. Not sure if I need to boil the wort or clean and sanitize since these
will boil in the pressure cooker but never hurts to be safe right? Pressure cooking jars 15PSI heats liquids to about 240* which kills
everything making cans of starter work safe to use right out of the jar. It’s time consuming up front but saves time making starters in the future. It would have been less time consuming had I possessed a pressure cooker that held more than five jars at once but chalk that up to user error.
Step Two: Brew IPA. I choose to do a 2.5 gallon BIAB IPA with a simple grain bill and hopped up with a mixture of Summit, Centennial and two ounces of Cascade. I mixed all of them together, averaged the Alpha Acid percentage to be
about 10% and bittered with a half ounce at 60 minutes before dumping in half ounce increments at 15, 10, 5, and then a remaining 1.5 ounces at flameout for a fifteen minute aroma steep before cooling. Contrary to my road map above I decided to use some British Ale II I had bottom cropped from a Bitter (more to come on that in a few weeks). Not really to style but it was easy and cheap.
Steps Three, Four and Five: To be determined. Step three begins by finding out what kind of giant beer I want to do. With a 10 gallon cooler as my mashtun I like the idea of cheating with malt extract for big beers so I don’t need to mash at a low water to grain ratio. Step four will be the Session beer with the Glacier hops. And finally step five; the three remaining pounds of LME. If I’m lazy this might go into step four. If not, we’ll see. Maybe I’ll can more starter wort but I don’t really want to do that in the near future again.
Well, at least my moral lapse is going to result in potentially four beers with enough starter wort to do a bunch of yeast starters.
So, in the long run I guess I don’t feel too bad about taking advantage of a glitch in the system.
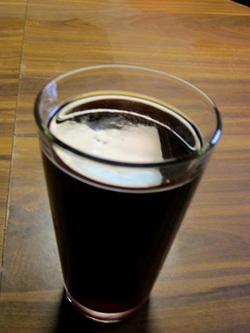
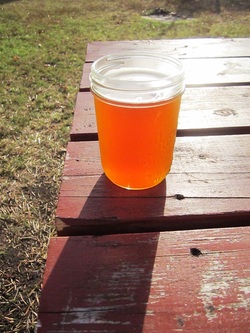 This was supposed to be my run at an Americanized session beer which basically means a hop forward, low gravity American Pale Ale. That said, I was a bit too good at extracting sugars that day and it wound up being a regular old APA. Oh well, you live and you learn. Anyways, without further adieu, the Galaxy Pale Ale Aroma: Hops, hops and more hops! This is a good smelling beer. A nice combination of citrus notes from the Cascade additions with a faint fruitiness from the Galaxy hops. Appearance: What could be a nice deep orange hue with an off white head gets blurred out with haziness from the dry hop addition. Wish I had snagged a picture before adding the hops because it looked good at first. Flavor: What you get first in the nose comes through in full force as soon as you take a sip. Hop domination with a heavy dose of that classic Cascade flavor mixed in with fruity notes from the Galaxy. Any kind of malt flavor or sweetness from the Vienna or Caravienna is hidden or balanced out by the hop presence. Not really picking up anything from the Biscuit malt either. Mouthfeel: Medium body and good carbonation. Smooth at first but almost finishes a bit harsh with the hop bitterness lingering. Overall Impressions: It’s a nice beer and it’s getting to where I want it to go but not there yet. A little heavy on the hops for what was supposed to be a lighter APA but I think it’s good. Now come the questions: what to do next time with all this in mind. As far as I see it I have two options: 1. Downgrade to the Sessionized American Pale Ale this was supposed to be. Honestly I like the grainbill and what I got out of this beer so just shrinking the recipe to hit 1.040 could work. Another option is subbing in Maris Otter which if going smaller could add some complexity to the beer and is never a terrible idea in my opinion. If I go down in gravity the hops would need to go down as well. I think Galaxy can be a bit dominating but I like the flavor a lot but they are a bit much so a lower AA hop might be a better option for a low gravity beer. Perhaps hopbursting at the end without a traditional bittering addition. Maybe dropping an addition or two or no dry hopping. Either way, while good, it’s a bit too hoppy now for a session beer. 2. Leave it as is and keep a good traditional APA. But there are still some things to consider here. I could up the gravity a tad to better balance the hops. And it still couldn’t hurt from a bit less intensity in terms of bitterness so maybe edging out an addition here or there. Maybe using a darker crystal malt for a bit more residual sweetness or using a higher mash temperature. 3. That's right, I said two option but now I've thought of a third which boils down to two different beers as described in options one and two. Make changes to this beer as outined in #2 while making a slightly newer recipe with a less intense hop as outlined in #1. Ah decisions, decisions. Life is hard.
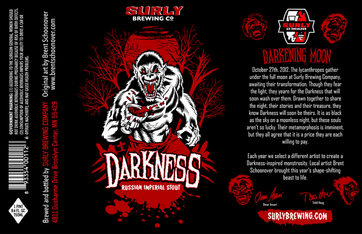 Last night I got to experience three of my favorite things: beer, music and free stuff. I know, heaven on earth right? My girlfriend won a pair of free tickets to see Stars from our local public radio music station The Current so the night started with as a trip to the Triple Rock (think local hipster, punk dive bar/small music venue). I had no idea who Stars were and we’ll get to that later just for fun but the real star of the night was the unexpected availability of Surly Darkness on tap. For those of you not familiar with it Surly Darkness is a seasonal Russian Imperial Stout which has adopted a bit of a cult following here in the craft beer world. People line up the night before and camp outside the brewery to get in line for Darkness Day. I have never gone but a limited amount of tickets are given away allowing people to purchase up to six bottles before it goes on sale to the general public. With this cult fandom in mind and my reluctance to go out of my way for a beer I wasn’t expecting to get a bottle or to find it at the bar so you can guess my excitement when I realized it was on tap. I’m writing this from recollection but the main thing to take away is not the details but rather the fact that this beer is fantastic. It’s everything a gigantic stout should be. It lives up to the name and appears as dark and evil in the glass as the dead horror monsters drawn up for the art work on the can. It smells out of this world with toffee, caramel sweetness and roast malts. The first sip is pure bliss with a heavy sweetness that actually balances out well with the hop bitterness so they each mesh together into an extremely intense yet pleasant combination. For a ten percent beer this is insanely drinkable yet being a huge ten percent beer on a Monday evening I could only bring myself to have one which is a decision I am already regretting. In our society today things are often hyped up beyond how good they actually are but Surly Darkness is not one of them. So, with a Darkness warming my belly and a somewhat lighter beer in hand the band I’ve never heard of started. If you have to generically lump Stars into a category I’d say they are somewhat of an indie rock band (whatever that means?) with a heavy mix of synthesizers, bass and a mix of both female and male vocals. Of the six members only the drummer and lead guitarist held their instruments through the whole show while the other four members swapped between keyboards, bass guitars, an assortment of synthesizers, acoustic and electric guitars and even some kind of odd keyboard/harmonica. The resulting music was a collection of heavily layered danceable rock tunes that seemed to alternate from synth to guitar heavy between every song. Not always my bag of tea, but Stars were well worth it for a free show at which I had one of the best beers I’ve ever had.
So what exactly is a session beer? Well, depending on who you are talking to you will get a range of answers. Some argue BJCP style guidelines and state that a session beer is either an English styled Mild or Bitter because the term session beer likely originated there. Some debate that it goes further than this argument and define the style in terms of alcohol content. Some may include Light mass produced American lagers in this category while others may not. What they do I think of as a session beer? I believe it can be just about any style and I personally fall more into the category that argues ABV% as the defining factor. So in my definition a Michelob Ultra would technically fall under the “definition” but that still doesn’t mean its any good. In the end though it doesn’t really matter how you define it as long as you know what you are looking for and this post is more about generic guidelines to follow regardless of the style. After doing some reading I picked out a few general tips following recipe formation from grain selection to mashing to hops to yeast to cold side fermentation. But before we start, here are a few things I looked at: http://www.byo.com/stories/beer-styles/article/indices/11-beer-styles/2344-session-beers-techniqueshttp://redwoodcoastbrewers.org/treatise_on_session_beers.htmlhttp://beersmith.com/blog/2011/09/15/session-beer-with-the-mad-fermentationist-beersmith-podcast-22/Grain: The goal here (in my opinion) is to get a lot of flavor out of the small amount of grain you are using so character malts are essential. Special Roast, aromatic, biscuit, crystal, honey and Munich malts are all great for adding additional body and flavor but they must be used in moderation. Other good options include Vienna or lighter Munichs, Carafa, lighter Crystal, or small amounts of roasted barley. While sugar is often cited in English Bitters it brings down FG, raises the alcohol content and provides no flavor so it doesn’t seem necessary unless those are your goals. In the end it comes down to balance and because your overall poundage of grain is significantly lower than a “normal”beer, ¼ lb or even just 1-2 ounces of specialty malts can make a difference. Mash: With the end goal being a low alcohol brew with flavor and body you can safely mash higher than normal. Achieving a more dextrinous wort will leave a higher final gravity and more unfermentable sugar behind which will aid in body and flavor. However, this is why balance of character malts is important. While you want body and flavor an excessive amount of crystal malt can easily overrun your beer and throw it out of balance. Watching the percentages as opposed to the total weight can help prevent this. Other options for mashing which should be mentioned include the full volume mash and the decoction mash. Using full volume without a sparge has been argued to increase flavor and body by some and cuts a step out of your brewday. Decoction mashing does the opposite by adding a lot of work to your brewday while debatably altering your beer in ways that cannot be achieved through grain additions and normal mashing but this is not the time or place to discuss the merits of a decoction mash. Another option is boiling down the first runnings in a separate kettle to achieve some kettle caramelization which deepens the color and the flavor of the wort but may not be appropriate of all styles. These are a few things to consider but none are ever necessary. Hops: Hopping a session beer is a fine line but the main goal is balance while achieving flavor. Hops are tricky because levels of flavor and aroma are determined by style but staying within the bitterness ratio of a given style is a good guide. If flavor and aroma is needed hops with lower alpha acids toward the end of the boil are easier to work with on a small scale than higher alpha acid hops. Ignoring a traditional bittering hop addition at 60 minutes and hopbursting (continuously hopping from 15-0 minutes) can help reach your desired IBUs while achieving an intense flavor and aroma. Dry hopping of course is another option which aids in flavor and aroma. Yeast: Again, this is a bit of personal preference but there are a few things to consider. First is flavor. Are you looking for the yeast to have an impact or simply to cleanly ferment the beer leaving the malt and hops to shine through? Second is attenuation. If you’re seeking that higher final gravity Safale US-05 may not be the way to go. Instead, less aggressive yeast strains with lower expected attenuation are available. Cold Side Fermentation: These steps aren’t really any different than any other beer but with a smaller and simpler beer off flavors have less to hide behind. So, in short: ferment at a stable temp, pitch proper amounts of healthy yeast, be extra crazy about cleaning and sanitizing and properly aerate your beer. Cold conditioning can also achieve a solid and drinkable product but isn’t always necessary.
|
 RSS Feed