UA-33535312-1
Immerse yourself in all things beer
 
              While fantasizing about the coming summer weather one thing that I couldn't help but think about was gardening and while thinking about gardening one thing I couldn't help but think about was growing hops.  Last summer I planted a Nugget hop rhizome in the backyard mostly because a Midwest Supplies catalog said they grew well in all climates and had a higher Alpha Acid content.  I knew nothing about them but decided to go for it because it sounded cool and easy to grow.  With a lot of time away from the house leading to poor care and a generally dry summer I finally got some cones growing at the end of the year but the two dozen or so that sprouted never came close to maturity leaving me without any homegrown hops.  And without any homegrown Nugget hops I still have not used the hops that I am growing in the backyard. So, long story short I was pondering this over the other day I decided a little research was necessary.

homebrewstuff.com had this to say:
11-16% All Purpose  
Strong heavy and herbal, spicy aroma and high bittering value (along with desirable growing traits) has brought this hop variety to the forefront of the industry.  Selected from a cross between Brewer's Gold and a high alpha male.
Used For: Extremely bitter. All Ales, Stouts
Subs: Chinook, Galena, Cluster 

The beerbecue, which I'm assuming is another homebrew blog out there, went a tad deeper: 
These are a common bittering hop, but some use them later in the boil, or for dry hopping, for the flavor and aroma they impart. The flavor and aroma are generally pungent, herbal, and spicy, much like the Columbus hop. Although, Columbus hops have a higher alpha acid content (bringing more bitterness to the beer), and Nugget hops lose less flavor and aroma from their essential oils over time due to their better storage stability.
Their similarity is no surprise, however, as apparently Nugget and Columbus hops share the same mother: Brewers Gold.

And highgravitybrew.com had this telling bit of information:
A high alpha acids hop with a good aroma profile

So basically what I’m getting here is spicy, herbal, pungent and strong.  Not really a whole lot of variety from description to description but at least this confirms my belief that they are a good hop to grow with desirably easy traits.  So now the question is what should I do with them.  Well, I guess the answer is to toss them in an IPA.  I think SMaSH brews are a bit boring although they would serve the best vehicle for experimenting with new hops but instead I’m going to shoot for a plain old IPA with some domestic 2-Row, a bit of Munich and a splash of Crystal-20.  Hopefully this will be a recipe that will give a bit of backbone to the beer but will not overpower the hop flavor which will be derived from a 60 minute bittering charge and then hopbursting and dry hopping at the end.  

Results to come.  Anyone have any experience with Nugget hops?  Like them?  Love them?  Hate them?
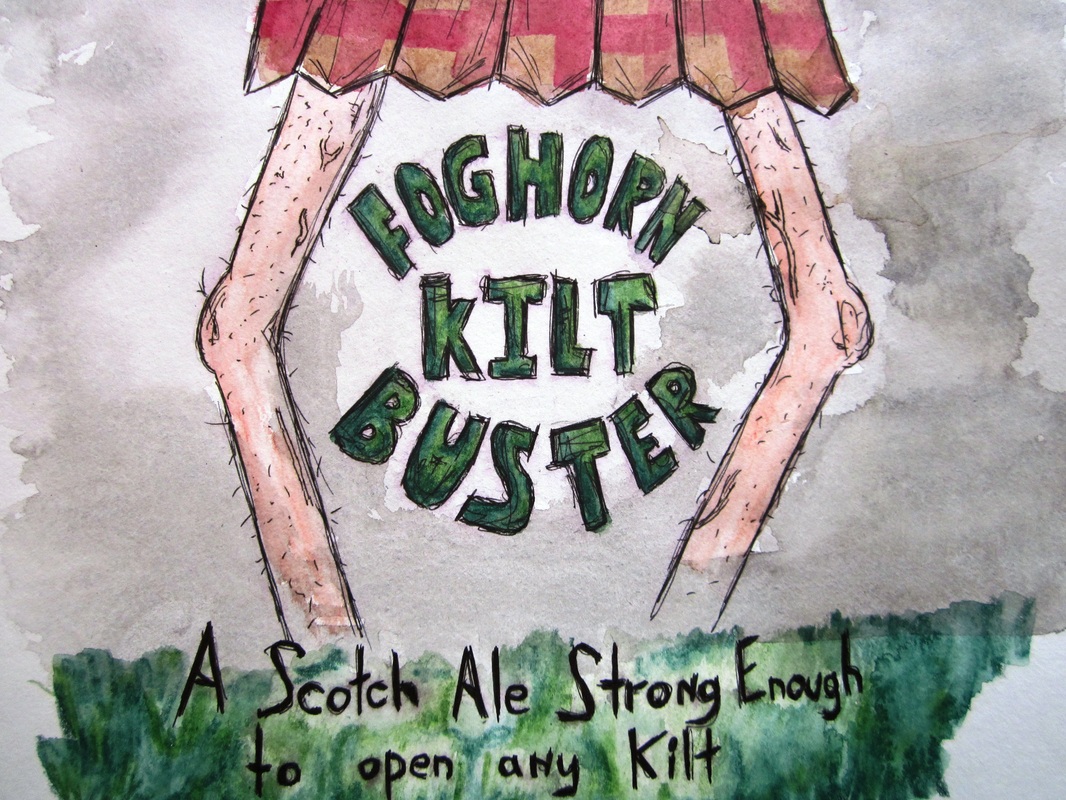
 
Just for fun here are a couple of my new quasi paintings that will be turned into labels in the future.  I say quasi-paintings because they look to be done with watercolor paints but they are actually watercolor pencils.  These are essentially dried watercolors that have been compressed into the form of a colored pencil.  You can sketch a drawing with them and then apply water with a paintbrush to get the watercolor painting effect.  I'm learning but still suck at watercolor painting so this is kind of a cheat that right now yields better results..  The wash in in the backgrounds is all traditional watercolor paint but the detailed parts are done with the pencil.  

Anyways, enough artsy-shmartsy stuff.  Here are the future labels for the Black Hole Mind Fucker Russian Imperial Stout and the Foghorn Kilt Buster Strong Scotch Ale.  A tasting will have to wait because they won't be opened until Christmas next year.  Yes, they are somewhat disgusting and volgure but these are going out to a group of guys so i
 
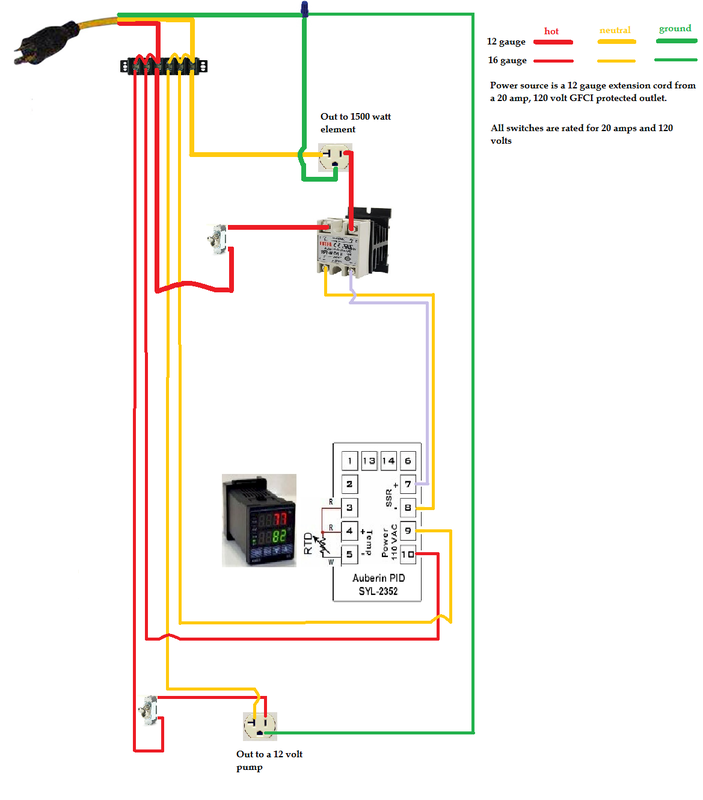
As of right now this is the diagram I am working with for my electrical system.  Pretty simple as far as these things go but two months ago I wouldn't be able to understand any of this.  And yes, I ghetto rigged this drawing with Microsoft paint.  I know, classy right?  

Anyways, this is pretty basic.  Power comes from a 20 amp 110 volt GCFI outlet in the kitchen through an extension cord with 12 gauge wire.  GCFI means that the outlet is protected and will switch off if something goes wrong and I needed the 12 gauge wire to care the amount of amps required for this. The cord goes into the box where I jump it through the terminal block to wire up everything I need.  There will be two switches and two outlets controlling the power to the pump and the heating element.  The switch to the element is needed so that it won't turn on whenever I plug in the control box which protects against dry firing which would ruin the element.  The switch and outlet for the pump is really just a convenience and I debated including it or just plugging it into the wall but decided it would be handy.  The PID, which is basically the controller of the whole operation, will always be on.  It will relay through the SSR when to turn on the heating element and when to turn it off to maintain mash temperatures and a boil.  The SSR is needed because the PID doesn't actually supply enough power for a heating element so the main power needs to be run through there.  

There may be a few add ons at some point in the future and this diagram leaves room for that.  You can attach an alarm to the PID to tell you when you meet strike temps meaning you can turn it on and walk away to go about your day until you're ready to dough in.  I will probably include some fuses also to protect my electrical equipment.  There may also be a master on/off switch in the future just for an added level of control. 
The Brew Kettle:  Complete with ball valve, RTD temperature probe and water heater element

Brew Kettle
7.5 Gallon Stainless Steel Kettle: 13 ½” high, 123/4” wide: $70
http://www.midwestsupplies.com/stainless-steel-kettle-with-handles-and-lid-7-5-gallon.html

Ball valve and diptube
½” SS Ball Valve: $21
http://www.midwestsupplies.com/stainless-steel-ball-valve.html
90* ½” SS Elbow for dip tube: $10
http://www.midwestsupplies.com/1-2-stainless-steel-female-npt-90-degree-elbow.html
Weldless Thermabob Adapter: $9
http://www.midwestsupplies.com/weld-b-gone-thermabob-adapter.html

RTD and attachment
Liquid Tight RTD Sensor: $35
http://www.auberins.com/index.php?main_page=product_info&cPath=20_15&products_id=246
Weldless Thermabob Adapter: $9
http://www.midwestsupplies.com/weld-b-gone-thermabob-adapter.html

Element and Attachments
Camco 1500W Screw in element: $9
http://www.amazon.com/Camco-02143-1500-Screw-Element/dp/B0006IX89Q/ref=sr_1_4?ie=UTF8&qid=1355153326&sr=8-4&keywords=120v+water+heating+element
1” SS Locknut: $6.5
http://www.amazon.com/gp/product/B003GXF5EO/ref=oh_details_o00_s00_i00
 Plug: $4
http://www.homedepot.com/buy/leviton-15-amp-125-volt-rubber-grounding-plug-r60-515pr-000.html#.UO4SaG8SffI
1 ¼” x 1 ¼” rubber coupling: $5.5
http://www.homedepot.com/h_d1/N-5yc1v/R-100055392/h_d2/ProductDisplay?catalogId=10053&langId=-1&keyword=coupling&storeId=10051#.UO4S7G8SffI

Pump and recirculation return
SS Pump: $75
http://www.ussolarpumps.com/onlinestore/index.php?main_page=product_info&cPath=1_22&products_id=32½”
SS Locknut: $4
http://www.midwestsupplies.com/1-2-female-stainless-lock-nut.html
½” SS MPT x ½” Barb: $7
http://www.midwestsupplies.com/1-2-mpt-x-1-2-barb-stainless.html
½” Silicone Tubing: $2.99 per foot
http://www.midwestsupplies.com/1-2-silicone-silcon-hose-per-foot.html
 ½” SS Tubing Clamp: $2
http://www.midwestsupplies.com/1-2-stainless-steel-tubing-clamp.html
 (3) Blichmann Quick Disconnects: $14
http://www.midwestsupplies.com/blichmann-quickconnectors-1-2-npt-x-1-2-id-hose.html
Shirron Plate Chiller
http://www.midwestsupplies.com/shirron-economy-counterflow-chiller.html

Control Box:  Controls mash temp, power to the heating element and the pump

Project Box (really just a plastic storage box): $4
http://www.target.com/p/sterilite-clip-box-set-of-4-green-medium/-/A-13487783?reco=Rec|pdp|13487783|ClickCP|item_page.vertical_1&lnk=Rec|pdp|ClickCP|item_page.vertical_1

PID, SSR, Heatsink
PID: SYL 2352: $45
http://www.auberins.com/index.php?main_page=product_info&cPath=1&products_id=3
40A SSR and Heatsink: $12
http://www.amazon.com/DC-AC-Solid-State-Relay-Heatsink/dp/B005K2IXHU/ref=sr_1_sc_1?ie=UTF8&qid=1355152467&sr=8-1-spell&keywords=25A+ssr+and+heatsing

Switches and outlets
(3) Gardner Bender single pole 20 amp toggle switches: $12
http://www.homedepot.com/h_d1/N-5yc1v/R-100030219/h_d2/ProductDisplay?catalogId=10053&langId=-1&keyword=20+amp+toggle+switch&storeId=10051#specifications
15 Amp Outlet: $3
http://www.homedepot.com/h_d1/N-5yc1v/R-202066674/h_d2/ProductDisplay?catalogId=10053&langId=-1&keyword=15amp+outlet&storeId=10051&superSkuId=202887036#.UN4UIG8SffI

Extension Cord
12-3, 25’ Extension cord: $21
http://www.menards.com/main/p-1908971-c-6410.htm

Wiring Guts
Gardner Bender 22 - 10 AWG 30-Amp 600-Volt 6-Circuit Terminal Block: $6
http://www.homedepot.com/h_d1/N-5yc1v/R-202522482/h_d2/ProductDisplay?catalogId=10053&langId=-1&keyword=terminal+block&storeId=10051#.UN4JEG8SffI
16 awg wire: $10  (bought a red and black)
http://www.homedepot.com/h_d1/N-5yc1v/R-202206417/h_d2/ProductDisplay?catalogId=10053&langId=-1&keyword=16+gauge+wire&storeId=10051#.UN4RT28SffI
An assortment of spade terminals, eye terminals, butt splices, heat shrink, electrical tape and probably a few other things.

 
Before I get to whether or not an electrical newb can pull off an electric brew in a bag setup we need a little background and explanation.  So a little about myself and what I want.  I started extract brewing with specialty grains and evolved into an all grain brewer via the ten gallon Rubbermaid cooler system with an eight gallon boil kettle and a propane burner.  I love the cheapness and simplicity of this system when paired with batch sparging but do have a couple of complaints about the equipment I use now and they are as follows:

1.    Equipment is scattered throughout the garage, basement and main floor of the house due to space constraints making it a big to-do to setup everything, clean it and return it to its proper place.

2.    I hate worrying about propane.  Buying it, guessing whether or not you have enough, guarding against the wind, worrying about burning the house down, ect.

3.    It sucks brewing outside in the winter in Minnesota. 

So with that in mind let’s talk about what I want.  I want something simple, electric and something that doesn’t suck up a lot of space.  Being that I don’t know much about electricity and that I don’t want to be confined to the basement I want to brew on a 20 amp 110 volt GFCI outlet rather than a 240 outlet which is located downstairs or would need to be installed upstairs.  I also want to keep this relatively inexpensive. 

With all of this floating around I stumbled upon this thread at homebrewtalk.com:  http://www.homebrewtalk.com/f170/110v-recirculating-ebiab-2-5-gallon-batches-341219/

It is pretty much everything I want.  I have the ability/time to brew frequently so I like the idea of 2.5 gallon batches, love the BIAB setup and like the relative simplicity of the electrical design.  It was however a bit more expensive than I wanted so I’m shooting for a cheaper version of this. While I do want cheaper I’m not looking to dumb it down which may compromise safety.  This setup also eliminates some of the issues I’ve had with small batches BIABs.  By this I mostly mean maintaining temperature and getting a good boil.  Overall there are three things I really like about this; the idea of full volume mashing BIAB, an electrically powered heating element and the recirculating mash. 

Full Volume Mashing BIAB:  I like this because it uses very little equipment meaning there is less to store and less to clean.  It is also simple, easy and fast and can be done indoors during MN winters.  And the main reason it is viable to me is because this setup still makes great all grain beer!

Electric:  I wanted to go electric because it gets rid of the need for annoying propane and it gets 100% efficiency with no wind or crappy stovetop burner to worry about.  Once again an upside is that it can be done inside but with a long enough extension cord can also be done outside in the summer.  I can also utilize a control panel to maintain mash temperature which brings me to my next point.

Recirculating mash:  I liked the idea of recirculating my mash because my pot is really thin and I’ve had trouble in the past of staying consistent with mash temperature.  A pump eliminates the need for stirring and also maintains a consistent temp when the control panel turns on the heating element.  Also, it looks better (and cooler I think) than trying to insulate your pot to maintain temperature. 

So there it is.  Everything is already in the works.  Can’t wait to properly get this up and running.