UA-33535312-1
Immerse yourself in all things beer
 
Picture
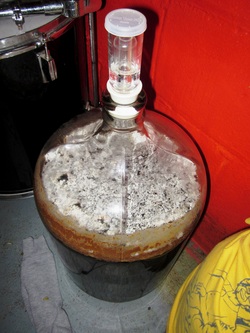
So after my incredibly long and trying decoction brew day a while back I wanted something easy to do so I wrote up a quick recipe for a 2.5 gallon APA using some 2-Row mixed with about 7.5% each of Biscuit Malt and C-20.  For the hops I figured I would try out a couple of new ones and decided on Palisade which I've gathered is a neutral bittering hop and Australian Galaxy for their passion fruit flavor and citrus aromas.  Keeping with the theme of simplicity I used straight up, good old Safale US-05.

There are so many good write ups out there that I'm not going to delve into process much but rather just post some links and discuss a couple reasons why I enjoy the BIAB process.  

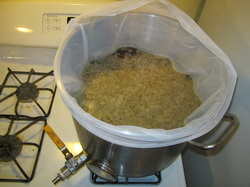
I personally like these two explanations because they were all about stove top BIAB which is what I do.
http://www.northernbrewer.com/connect/episode/brewing-tv-episode-54-jakes-got-a-brand-new-bag/
 http://homebrewmanual.com/brew-in-a-bag/ 
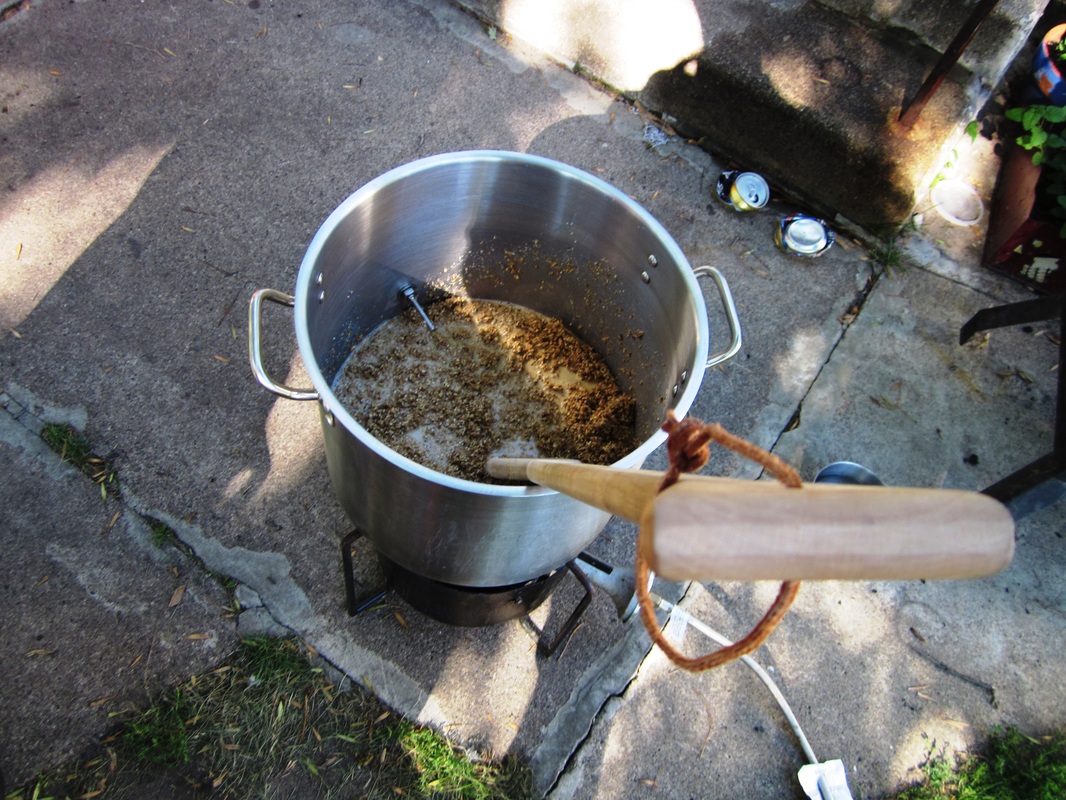
This one was also great and was for larger batches outside:
http://www.homebrewtalk.com/f36/biab-brewing-pics-233289/
 
So why do I love BIAB?  I'll give you three quick reasons.
1st:  It's super easy!  With an hour long mash, an hour long boil and all the heating and cooling time in between the brew day really isn't much shorter but it feels easier for some reason.  Perhaps its because I don't have to lug all my cooler gear from up in the basement and the burner and propane from the garage.  Perhaps it's the fact that I get to sit in the comfort of my own home and just hang out while it works its magic on the stove top.  Perhaps it's how easy cleaning and putting away equipment is.  Or most likely it's the combination of all four.  

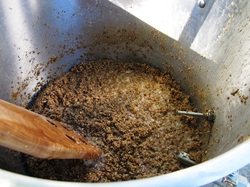
Either way, BIAB is simple.  Especially when employing a full volume mash without a sparge.  I hit all of my numbers perfect with an expected brewhouse efficiency of 60% and I'm sure I could have gone higher had I sparged a bit but I was once again shooting for something quick, easy and painless.  However, bumping my efficiency up a handful of points and saving a dollar or two on grain just doesn't seem worth the extra heating and effort when that is what I am specifically trying to avoid. 

2nd:  It let's me brew more.  Now I know not everyone is into this seeing that people are strapped for time so people moving from five gallon batches tend to move to ten or fifteen rather than move down to three or less.  But for me I like the process and more importantly I like experimenting with ingredients and recipes.  I feel safer trying out new things on small stages rather than jumping straight to a five gallon recipe.  So far small batches of BIAB have allowed me to test out a Smoked Imperial Stout, an English Barleywine, my Hybrid Citraburst, and I have a slew of other recipes waiting for testing.  

3rd:  While this wasn't my experience, I could see BIAB being a great introduction to all grain brewing.  It is cheap, easy and a step up from extract brewing.  Instead of jumping off the deep end it would offer a brewer the chance to spend a few bucks on a proper bag and maybe a bit more on a larger pot which they will need anyways for all grain brewing or full volume extract brews.  It potentially could be a nice intermediate step.


Picture
The Pacific Belgian.  An aggressively hopped IPA utilizing exclusively New Zealand variety hops and a Belgian yeast strain.  Brewed.  Fermented.  Racked.  And dry hopped.  Everything is going smoothly as it makes its way to the keg next week....oh wait....what is that....why are you foaming....oh crap what do I do....panic....ummm.....

Well as you can tell I got my very first taste of a dry hopping explosion and it wasn't pretty.  Not sure why this has never happened before or really why it happened this time but I lost what appears to be nearly all of my two ounces of New Zealand hops which in a liquid foamy form unsurprisingly makes a huge mess.    I "solved" the problem as best I could by grabbing the camera and deciding to wait it out.

From what I gather I am not the first person to experience this mess.  As a byproduct of fermentation CO2 is emitted which we all know.  However, when CO2 remains suspended in the beer for whatever reason and is exposed to a solid such as hop pellets a nucleation site is formed where the CO2 will begin to escape.  According to the Nucleation Wikipedia page (I know right, don't use Wikipedia as a reference) another example would be when bubbles of CO2 trapped in a carbonated Diet Coke nucleate upon touching the surface of a bunch of Mentos.

So why is there so much suspended CO2?  For my beer I'm not sure.  If a beer/liquid is at a lower temperature CO2 saturates it more easily.  This is why a cold keg will carbonate fast than a warm keg or why priming sugar calculators ask for the temperature of the beer.  The Pacific Belgian was sitting at a warm 72* so cross that off.  It could also be due to an unfinished fermentation.  Well, it's been over a month with a steady FG of 1.007 so I'm pretty sure it's done.  So for some reason I had a ton of CO2 in my beer which was evident when I tasted the sample I pulled before adding the dry hops.  Swishing it around in my mouth it felt almost like a under-carbonated beer.

So, how can someone avoid this in the future?  Well, make sure fermentation is finished, your beer is at a warm temp and you have adequate space in your carboy for dry hopping.  Also, this problem can be alleviated by racking onto hops so that if you notice excessive foaming you can simply stop the flow of beer temporarily while it dies down.  Most importantly though it would seem that you should know that this can happen and you should plan for it.  Something I was unaware of and obviously did not do.  Now, off to the store for more hops since I lost all of mine.


Picture
The wort is cooled, the yeast is pitched and the decocted Oktoberfest is sitting downstairs after what can only be described as an epic brew day.  So now the questioning begins; was it worth it?  Obviously without the final product here in front of me there is no real way of knowing but at least I can talk about it from the perspective of someone who just finished the process so I’ll briefly run through some pros and cons of my decoction mash today.  If you are reading this and don’t know much about decoction mashing here are some links I looked up to do my research:

http://byo.com/stories/techniques/article/indices/45-mashing/541-decoction-mashing-techniques

http://beaconhillsbrewhouse.wordpress.com/2011/05/23/decoction-mashing-benefits-and-cons/

http://thebrewingnetwork.com/shows/527

Pros:

1.      It was fun!  Honestly I like the homebrewing process as much as if not more than the finished product so I like to do things hands on when I have the time.  Decoction mashed definitely fit the bill.  It sounds weird but I feel more connect to this beer than any other because it was as hands on as you could without actually sticking your arms in your wort.  Endless stirring while standing directly next to a flaming burner was so much more work than any other normal, single infusion beer.

2.      My efficiency was through the roof.  Ten percentage points above my expected brewhouse efficiency to be exact which yielded me an Oktoberfest starting at 1.062 when I was shooting for 1.053.  Imperial Fest? 

3.      I got to sound cool talking to my friends about the history of the decoction mash and thoroughly enjoyed the process of learning more about it.  As a history buff this is the kind of stuff I like so when I combine it with beer I’m pretty much in heaven.

Cons:

1.       It really, really, really took a long time.  I did a protein rest which I normally bypass, pulled and boiled a ton of grist to get up to 147*, let it sit, pulled more and boiled to get up to 156*, waited, pulled the wort which I heated up for a mashout addition at 168* and then did my normal batch sparging routine.  For someone who has been working on transforming their brew day into an efficient well oiled machine this was definitely different.

2.      I struggled to hit my temps and needed additional boiling water each time to bring them up.  I need to do some research on this but I took the lazy route and let Beersmith dictate my schedule for me and it did not work out well.  I’m not positive in this but my hypothesis is that I pulled to thickly from the grist without enough liquid which caused unequal heating when adding back the boiled grist. 

3.       I burned through a ton of propane today.  Because I like to conserve energy sources as much as possible and because I’m super cheap I’ve been trying to cut back on propane usage lately which has resulted in heating strike water on the stove top instead of on the propane burner.  I guess I could have boiled my decoctions on the stove tops as well but it was such a nice day outside that I did it on the burner and when combined with a ninety minute boil I really put a dent in my propane supply.

So that leaves the lingering question; was it worth it?  In the end I think it was simply because of the first pro that I listed; it was fun.  With today’s improved malt quality, the invention of the thermometer and the ease of a “normal” brew day I’d say there is no way a decoction mash could be worth it if you are not enjoying the added work.  Like I said, it really, really took a long time to do and was very intensive both mentally and physically so if you aren’t interested in adding a somewhat unnecessary historical method to your beer I don’t think you should do it.  If you’re a hands on beer nerd who likes to do more than what is required than this might be for you to try at least once. 

Just finished up what seemed like an epic brewday

 
So everything about this beer from inception was a bit of a experiment so let me explain why before briefly going over how it turned out.  

1st: I was planning on going to a music festival for which I wanted some good homebrew to supplement the PBR  but they prohibited glass and kegs so I wanted to test out bottling in 2-Liter bottles.
2nd: I had never used Citra hops and had some laying around so I wanted to test them out.
3rd: I have never really tried hopbursting a beer before and wanted to try that out.  
4th: I have never done a SMaSH recipe before and wanted to try that out.

So first off the 2-liter bottling was a great success.  I did a 2.25 gallon batch and had just over enough for three 2-liter bottles.  I used Root-beer and Ginger Ale bottles and even after cleaning with PBW and sanitizing with Star San the smell of the soda wafted out while I was bottling but luckily the Citra hops overpowered anything left behind during drinking.  I used Northern Brewers priming sugar calculator and it carbed up just perfect in two weeks and with a full campsite of people we were able to drink each bottle quickly enough that there were no issues with the beer going flat.  Overall I thought this was a great idea for special occasions like this because it was easy to transport, share and then clean up with no negative affect on the beer.  

Secondly; Citra Hops are awesome!  They were packed full of aroma and flavor and I have never heard of a more appropriately named hop.  Honestly, as much as I liked them I think they would be even better as an accent hop because while they were great by themselves I found the beer overall to be a bit simplistic in taste.  Perhaps with a more traditional bittering addition they really would have thrived.  Or with another flavor addition and then utilizing these as a aroma and dry-hop addition.

Thirdly; hopbursting was interesting to try.  I went with no bittering addition and did a 15, 10, 5, 0 hop schedule with a half ounce of Citra each time and my kitchen smelled glorious.  However, while I was being punched in the face with the Citra aroma and flavor the beer seemed to be a bit lacking in complexity.

Fourth and finally I failed miserably at the SMaSH recipe.  Maybe someday but every time I attempt to do one I find myself adding something at the store.  This time it was 5% Honey Malt which in the end I think did add to the sweetness and was  nice complement to the Citra.  I also tossed two ounces of Midnight Wheat in for a color adjustment which wound up being over the top and producing a much darker wort that I had expected.

Overall though this beer was pretty tasty and exactly what I was shooting for on a hot summers day.  The simplicity of the grist along with the crispness of the San Francisco Lager Yeast really let the hops shine through while producing a very sessionable tasting 5% beer. 

Hybrid Citraburst 
American Pale Ale 
Batch Size (fermenter): 2.25 gal 
Brewer: Charles Madison 
Brewhouse Efficiency: 65.00 %

Ingredients Amt Name Type # %/IBU 
4 lbs 12.0 oz Briess 2-Row Brewers Malt (1.8 SRM) Grain 1 92.7 % 
4.0 oz Honey Malt (25.0 SRM) Grain 2 4.9 % 
2.0 oz Midnight Wheat (550.0 SRM) Grain 3 2.4 % 

0.50 oz Citra [12.00 %] - Boil 15.0 min Hop 4 21.1 IBUs 
0.50 oz Citra [12.00 %] - Boil 10.0 min Hop 5 15.4 IBUs 
0.50 oz Citra [12.00 %] - Boil 5.0 min Hop 6 9.3 IBUs 
0.50 oz Citra [12.00 %] - Boil 0.0 min Hop 7 0.0 IBUs 

San Francisco Lager yeast slurry from previous batch
 
Picture
So that first month into my first ever sour beer, a Flanders Red, I couldn't see myself possible forgetting about this mysterious new beer sitting in the dank corner of my basement.  Then out of no where it slipped from my mind until a while back when I went to move a carboy in the basement and decided the three month mark was an appropriate time to steal a tasting.  What I got was a pretty damn good beer; an amazing red color, slightly fruity aroma, no hops, light-bodied, a hint of fruitiness in the taste, incredibly easy to drink and a very slight yet lingering tartness.

So I forgot about it again until today when I decided to sneak a peek under it's tee-shirt and there they were; disgusting, vividly white bubbles!  Pellicle!  I'm assuming I introduced some oxygen to the carboy when I took that sample which prompted its formation.

Like I said this is my first sour so I have no experience here so any comments on the pictures would be great.  I've heard some people do not ever get a pellicle so I was excited to see this nastiness when I pulled off it's shirt.  It truly looks disgusting.  There is just no way around that fact other than to think of how amazing it will be sometime next year.

Here's the recipe just for your reference courtesy of Brew Your Own:

West Flanders Red Ale
by Jeff Sparrow
(5-gallons/19 L, all-grain)
OG = 1.057  FG = 1.002–1.012
IBU = 11  SRM = 22  ABV = 6.5%


Ingredients
  • 5 lbs. 5 oz. (2.4 kg) Vienna malt
  • 2 lbs. 8 oz. (1.1 kg) Pils malt
  • 15 oz. (0.43 kg) aromatic malt
  • 15 oz. (0.43 kg) CaraVienne malt
  • 2 lbs. 2 oz. (0.96 kg) raw wheat
  • 5.0 oz. (0.14 kg) special B malt
  • 3 AAU Hallertau hops (60 mins) (0.75 oz./21 g of 4.0% alpha acids)
  • 2.0 oz. (57 g) oak cubes (medium toast)
  • Wyeast 3763 (Roeselare Blend) or White Labs WLP655 (Belgian Sour Mix)

Picture
It's hard to get a good shot through glass so I popped off the airlock just long enough to get a top down view.
Picture
A bit hard to tell from this angle but there are some bubbles in there that are probably about two inches in diameter.
Picture
Bonus picture of my Barleywine with the Golden Girls keeping the light out. That's right, I have a Golden Girls tee-shirt covering the carboy of my 12.9% Barleywine!
 
Picture
What's that you say? A hugely dark stout for the end of July?  That sounds delicious but not very thirst quenching for an 85* day.  Well, you would be absolutely right if this were a stout and not a lager.  

In House Brew's first attempt at a Schwarzbier (basically a northern German Black Lager) has been bottled for a bit and turned out alright.  While it is passable as an alcoholic beverage this wouldn't be a competition beer for several reasons.  First off, I went a tad overboard on the Carafa III to give it a jet black color which is not exactly to style despite being called a dark lager.  That said it does look awesome!  

Secondly there is just something slightly off about the taste.  It's final gravity finished high leaving it a little heavier than I wanted which when combined to the rich Munich sweetness is just a bit overboard.  I also think I got a hint of diacetyl and some kind of fruity esters which I can't really pin down but are definitely there.  I guess I can't complain too much; this whole beer was all an experiment to test how much work it would be to ferment a lager in a swamp cooler while adding some ice to maintain the cool temperature (answer by the way is too much, it was too much work to make it worth it in my opinion).  This resulted in some temp swings which is probably responsible for some of the undesirables and the yeast most likely dropped out early when I tried to add too much ice to compensate for a jump in temp.


So overall I'll still rate this beer in the drinkable range.  It's not horrible, just not great.  I'd be curious to try something like it again in the winter or with the Bohemian Lager Wyeast which I've read can ferment successfully with lager characteristics at warmer temperatures.