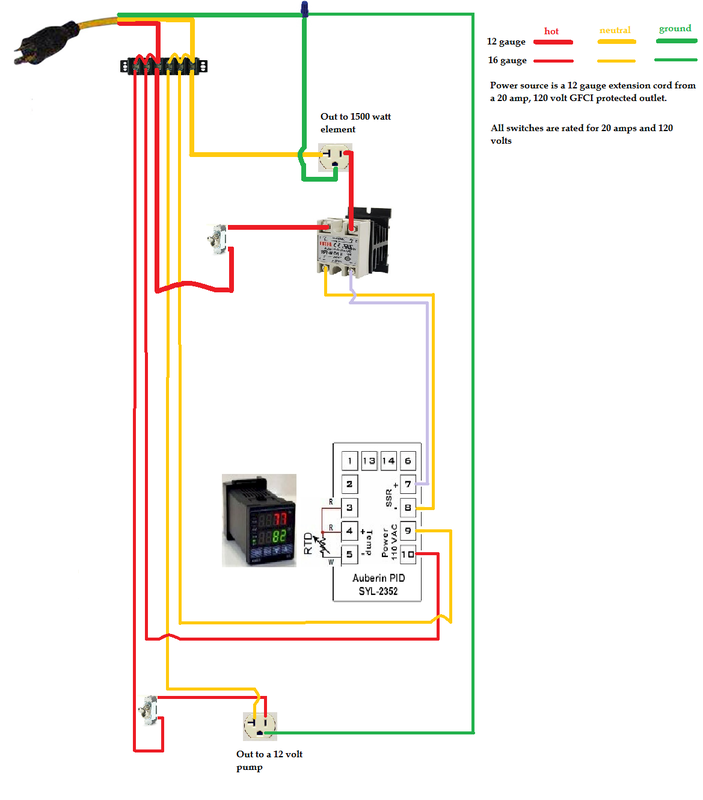
As of right now this is the diagram I am working with for my electrical system. Pretty simple as far as these things go but two months ago I wouldn't be able to understand any of this. And yes, I ghetto rigged this drawing with Microsoft paint. I know, classy right?
Anyways, this is pretty basic. Power comes from a 20 amp 110 volt GCFI outlet in the kitchen through an extension cord with 12 gauge wire. GCFI means that the outlet is protected and will switch off if something goes wrong and I needed the 12 gauge wire to care the amount of amps required for this. The cord goes into the box where I jump it through the terminal block to wire up everything I need. There will be two switches and two outlets controlling the power to the pump and the heating element. The switch to the element is needed so that it won't turn on whenever I plug in the control box which protects against dry firing which would ruin the element. The switch and outlet for the pump is really just a convenience and I debated including it or just plugging it into the wall but decided it would be handy. The PID, which is basically the controller of the whole operation, will always be on. It will relay through the SSR when to turn on the heating element and when to turn it off to maintain mash temperatures and a boil. The SSR is needed because the PID doesn't actually supply enough power for a heating element so the main power needs to be run through there.
Anyways, this is pretty basic. Power comes from a 20 amp 110 volt GCFI outlet in the kitchen through an extension cord with 12 gauge wire. GCFI means that the outlet is protected and will switch off if something goes wrong and I needed the 12 gauge wire to care the amount of amps required for this. The cord goes into the box where I jump it through the terminal block to wire up everything I need. There will be two switches and two outlets controlling the power to the pump and the heating element. The switch to the element is needed so that it won't turn on whenever I plug in the control box which protects against dry firing which would ruin the element. The switch and outlet for the pump is really just a convenience and I debated including it or just plugging it into the wall but decided it would be handy. The PID, which is basically the controller of the whole operation, will always be on. It will relay through the SSR when to turn on the heating element and when to turn it off to maintain mash temperatures and a boil. The SSR is needed because the PID doesn't actually supply enough power for a heating element so the main power needs to be run through there.
There may be a few add ons at some point in the future and this diagram leaves room for that. You can attach an alarm to the PID to tell you when you meet strike temps meaning you can turn it on and walk away to go about your day until you're ready to dough in. I will probably include some fuses also to protect my electrical equipment. There may also be a master on/off switch in the future just for an added level of control.
The Brew Kettle: Complete with ball valve, RTD temperature probe and water heater element
Brew Kettle
7.5 Gallon Stainless Steel Kettle: 13 ½” high, 123/4” wide: $70
http://www.midwestsupplies.com/stainless-steel-kettle-with-handles-and-lid-7-5-gallon.html
Ball valve and diptube
½” SS Ball Valve: $21
http://www.midwestsupplies.com/stainless-steel-ball-valve.html
90* ½” SS Elbow for dip tube: $10
http://www.midwestsupplies.com/1-2-stainless-steel-female-npt-90-degree-elbow.html
Weldless Thermabob Adapter: $9
http://www.midwestsupplies.com/weld-b-gone-thermabob-adapter.html
RTD and attachment
Liquid Tight RTD Sensor: $35
http://www.auberins.com/index.php?main_page=product_info&cPath=20_15&products_id=246
Weldless Thermabob Adapter: $9
http://www.midwestsupplies.com/weld-b-gone-thermabob-adapter.html
Element and Attachments
Camco 1500W Screw in element: $9
http://www.amazon.com/Camco-02143-1500-Screw-Element/dp/B0006IX89Q/ref=sr_1_4?ie=UTF8&qid=1355153326&sr=8-4&keywords=120v+water+heating+element
1” SS Locknut: $6.5
http://www.amazon.com/gp/product/B003GXF5EO/ref=oh_details_o00_s00_i00
Plug: $4
http://www.homedepot.com/buy/leviton-15-amp-125-volt-rubber-grounding-plug-r60-515pr-000.html#.UO4SaG8SffI
1 ¼” x 1 ¼” rubber coupling: $5.5
http://www.homedepot.com/h_d1/N-5yc1v/R-100055392/h_d2/ProductDisplay?catalogId=10053&langId=-1&keyword=coupling&storeId=10051#.UO4S7G8SffI
Pump and recirculation return
SS Pump: $75
http://www.ussolarpumps.com/onlinestore/index.php?main_page=product_info&cPath=1_22&products_id=32½”
SS Locknut: $4
http://www.midwestsupplies.com/1-2-female-stainless-lock-nut.html
½” SS MPT x ½” Barb: $7
http://www.midwestsupplies.com/1-2-mpt-x-1-2-barb-stainless.html
½” Silicone Tubing: $2.99 per foot
http://www.midwestsupplies.com/1-2-silicone-silcon-hose-per-foot.html
½” SS Tubing Clamp: $2
http://www.midwestsupplies.com/1-2-stainless-steel-tubing-clamp.html
(3) Blichmann Quick Disconnects: $14
http://www.midwestsupplies.com/blichmann-quickconnectors-1-2-npt-x-1-2-id-hose.html
Shirron Plate Chiller
http://www.midwestsupplies.com/shirron-economy-counterflow-chiller.html
Control Box: Controls mash temp, power to the heating element and the pump
Project Box (really just a plastic storage box): $4
http://www.target.com/p/sterilite-clip-box-set-of-4-green-medium/-/A-13487783?reco=Rec|pdp|13487783|ClickCP|item_page.vertical_1&lnk=Rec|pdp|ClickCP|item_page.vertical_1
PID, SSR, Heatsink
PID: SYL 2352: $45
http://www.auberins.com/index.php?main_page=product_info&cPath=1&products_id=3
40A SSR and Heatsink: $12
http://www.amazon.com/DC-AC-Solid-State-Relay-Heatsink/dp/B005K2IXHU/ref=sr_1_sc_1?ie=UTF8&qid=1355152467&sr=8-1-spell&keywords=25A+ssr+and+heatsing
Switches and outlets
(3) Gardner Bender single pole 20 amp toggle switches: $12
http://www.homedepot.com/h_d1/N-5yc1v/R-100030219/h_d2/ProductDisplay?catalogId=10053&langId=-1&keyword=20+amp+toggle+switch&storeId=10051#specifications
15 Amp Outlet: $3
http://www.homedepot.com/h_d1/N-5yc1v/R-202066674/h_d2/ProductDisplay?catalogId=10053&langId=-1&keyword=15amp+outlet&storeId=10051&superSkuId=202887036#.UN4UIG8SffI
Extension Cord
12-3, 25’ Extension cord: $21
http://www.menards.com/main/p-1908971-c-6410.htm
Wiring Guts
Gardner Bender 22 - 10 AWG 30-Amp 600-Volt 6-Circuit Terminal Block: $6
http://www.homedepot.com/h_d1/N-5yc1v/R-202522482/h_d2/ProductDisplay?catalogId=10053&langId=-1&keyword=terminal+block&storeId=10051#.UN4JEG8SffI
16 awg wire: $10 (bought a red and black)
http://www.homedepot.com/h_d1/N-5yc1v/R-202206417/h_d2/ProductDisplay?catalogId=10053&langId=-1&keyword=16+gauge+wire&storeId=10051#.UN4RT28SffI
An assortment of spade terminals, eye terminals, butt splices, heat shrink, electrical tape and probably a few other things.
 RSS Feed